CHAPTER 4
|
|
CHAPTER 4 |
1 2 3 4 5 6 HOME | ||
| Stealth, Sensors, Weapons & Countermeasures | |||||
IN THIS CHAPTER
RAH-66 Comanche LO (low observability)
Simulating Stealth
Radar / FCR Operation
Radar Information Filters Part I - Threat Priority
Radar Information Filters Part II - ENEMY Filter
Radar Line Of Sight
Radar Sweep Periods
Electro Optical Sensors - Advantages
Helmet Mounted Sight
Advanced Gunnery LOAL/LOBL
Rapid Fire Missile Attack Mode
Target Persistence
Ballistic Weapon Attack Modes
Spoofing IR and Radar Guided Missiles
4.1 RAH-66 Comanche LO (low observability)
It's generally thought that the RAH-66 is a stealth helicopter, invisible to radar; this is a common misconception. Stealth is not magic bullet or piece of hardware, it is really a set of specifications or "low-observable" concepts which together reduce the visibility of the helicopter.
|
The Comanche's visibility to enemy radar depends on how "clean" the helicopter is. With gear down, gun deployed and open weapon-bay, the Comanche is just as visible to enemy radar as any conventional helicopter. Most helicopters are naturally "stealthy" by their low flying nature and using the terrain to mask themselves. No hi-tech fuselage or radar absorbing material can match the stealth properties afforded by a large hill between a radar and an aircraft. |
 |
The Comanche's main mission role is reconnaissance. In the recon role, the Comanche flies in a clean (wingless) configuration which greatly reduces the amount of radar energy it reflects.
The LO properties of a clean "buttoned up" Comanche allow it to get much closer to a target without being detected - but once the gunship goes "hot" then it becomes much more visible. You either have to keep quiet and then go for a surprise attack (shoot & scoot) or retreat to a stand-off position before arming and firing.
The act of arming weapons (even the cannon) results in the weapon bay opening and thus potentially giving away your presence.
Simulating Stealth
To simulate the effects of stealth characteristics, a lo-observable platform is only visible to search radar's at closer ranges than other platforms. The net effect is that the scan ranges of other vehicles are reduced. i.e.. a vehicle with a 10Km scan range will detect the Comanche at 1.5Km
The "stealth value" of the Comanche is based on its configuration. For each possible configuration there is a cumulative reduction of visibility:
a) Stub wings attached no stealth b) Gear up -35% reduced visibility c) Bay doors shut -50% reduced visibility e) Radar On +10% increased visibility f) IR or ECM Jammer On +10% increased visibility
Gear Up
Bay Doors Shut
Detection Range Modifier %100
-35
-50
15 (percent)Therefore if the Comanche is all tucked into bed, with no radar or jammer emissions, your radar signature will be reduced to a minimum of 15%. Therefore a Mi-28N Havoc with a scan range of 6km will only detect the Comanche at 900 meters. For a list of vehicle scan ranges, see Chapter 5.
All aircraft have 100% radar sig except the Comanche.
4.2 Radar / FCR Operation
The radar systems modelled for both the Blue and Red Force helicopters are near identical in functionality. The only real difference being the maximum detection range.
There are subtle methods of operating the radar which enable special forms of missile attack and can increase the crews awareness and survivability.
Simplification of the radar systems were made for the Enemy Engaged series for reasons of accessibility and balancing the gameplay between the two opposing forces. The older Mi-28N Havoc does not have the luxury of shared electronic battlefield information displays such as the Tactical Situation Display modes of the Apache and Comanche.
In multiplay, it is possible to share target information with human players, but this is not possible with computer AI controlled entities.
4.21 Radar Information Filters Part I - Threat Priority
Use the radar priority filter.
The Longbow Fire Control radar system used in the Apache and Comanche (the Hokum and Havoc use similar systems) has the ability to reduce "operator overload" - the display can filter out certain object types. In real life operation, a reflected radar signal is digitally processed by a black box, due to the wavelength of the radar it can be processed in such a way as to derive basic structure information from the reflected energy. This feature is modelled to a small degree in Enemy Engaged.
The radar can determine if the object is a wheeled or tracked vehicle. Also it can detect a "turret" structure such as those commonly found on tanks. Using this information, the avionics automatically classify detected objects and assign them a potential "threat priority" value.
The radar symbol used in Enemy Engaged is the result of this information. Each detected object is assigned a LOW, MEDIUM or HIGH threat priority.
- High threat priority is given to anti-aircraft vehicles such as mobile SAM launchers which are of immediate concern to the helicopter crew.
- Medium is reserved for armoured vehicles such as tanks and personnel carriers.
- Low is assigned to everything else, basic trucks, cars, well defined structures.
Enemy Engaged permits the radar operator to set the threat priority level, this will only display those targets that fall within the selected classification.
 |
|
Figure
4.2: The target filter set to display only |
This feature is extremely invaluable when engaging armoured columns. When the targets are so closely grouped together presenting many targets in such a small area - it is desirable to eliminate the surface to air defences before they can engage you.
By setting the threat filter to HIGH, only those SAMs in the armoured column will be displayed and targeted by the radar. Also, by targeting only medium threat objects, you can ensure you do not waste valuable missiles on non-priority targets.
The priority filter reduces the time spent identifying and cycling through objects and can be used in conjunction with a high re-sweep rate to rapidly degrade enemy response at the beginning of an engagement.
Radar priority settings have no effect in optical sensor modes.
Radar Information Filters Part II - Air Radar ENEMY / IFF Filter
This filter (only activated while the air radar is active) only displays enemy air contacts on the display. You could consider this as contacts which did not return an automatic response to a coded IFF (Identify Friend or Foe) interrogation signal. You may want to activate this as part of your startup routine.

|
|
Figure
4-3: The "Enemy" contact filter of |
Radar Line Of Sight
The LOS indicator in the "high action display" or HUD is very important when using the radar pre or post missile attack.
When a missile hits and destroys a target, the radar will continue to display that target until it has been re-swept by the radar. And even then, there needs to be radar line of sight to the destroyed target before the system can remove it (this is assumed to be interaction between the radar system and co-pilot confirming destruction). Unlike many other simulations, dead targets are not magically removed. The operator must keep this in mind, otherwise serious "overkill" may result (Overkill: meaning target is attacked with more munitions than that required to destroy it).
Apache LOAL Attack Consideration
This makes LOAL missile attacks in the Longbow more difficult as it requires re-establishing visual contact of the engaged targets before destroyed targets can be "confirmed" killed and removed. This enforces a limited method of BDA (battle damage assessment).
Sweep Periods
The sweep period is another important operator consideration. There is the a reason why there is a sweep angle indicator in the HUD, it's not just eye candy, it provides a visual reference useful during rapid fire missile attacks.
For example, spacing between laser or command guided missiles using the radar as the targeting systems needs to be longer than the sweep period. A destroyed target will remain targeted until it is re-swept by the radar.
If the HUD displays the radar sweep indicator, this can be used as a "metronome" for missile release. Firing a missile each time it hits the left (or right) side will ensure that the target area is re-swept between missiles.
Narrow the sweep for faster updates.
Figure 4-4: Narrow radar sweep for rapid
targeting updates during an attack.When attacking a road convoy, radar line of sight is another reason to narrow the sweep angle. Vehicles can HIDE behind other vehicles. A vehicle hit by a missile can be thrown several meters thus revealing another vehicle behind it. A rapid radar sweep will detect new targets much faster. Some ground vehicles have heavy calibre machine guns which can assault you as far out as 3 km.
It's not the detected threats that will kill you, it's the undetected ones.
In urban or built up areas in which there can be plenty of unwanted bridge or supply factory structures in the target list, use the radar range setting in conjunction with the sweep angle to "confine" your desired target area. The Figure below shows the ground radar being used such that the bridge structures on the right are not targeted by the scan volume.
The need to use the sweep angle will vary from situation to situation. Many times it may not be required at all. But the capabilities should be kept in mind, especially with regard to the air radar and the long sweep period required for a 360 degree scan.
When retreating from an area in which an enemy air response may arrive, it may be wise to set the air radar to sweep that rear quadrant. In the time it takes the air radar to sweep 360 degrees, a fighter can fly within weapons range, lock on and fire. Early detection will increase your reaction time and hence your survival.
Also, it is possible to use a rapid fire laser or radio command guided missile attack against multiple air targets *only* in conjunction with a narrow scan volume. Only a 45 degree sweep angle will be fast enough to remove downed air targets after multiple missile release. More details on rapid fire missile attacks are covered later in this chapter.
4.3 Optical Systems
Lets take a look at the EO (electro optical) modes, their uses and differences.
Advantages Over Radar Acquisition
There are occasions where the ground radar does not have enough resolution or the correct angle on objects to detect them.
In "noisy" places such as among wrecked vehicles or close to tree canopy, the radar may fail to pick up a potential threat. Optical sensors should be used to double check, by placing the helicopter into a hover and manually sweeping the EO sensor crosshairs around, any live objects can be picked up.
Notes on coming to a Hover
To quickly come to a hover, activate the autopilot and press SHIFT H.
Once you sweep your sensor over a target and the designator box flickers, it has been entered into the target list and can by cycled though or locked up like any radar acquired target. At ranges of less than 5km, enough object detail is perceivable to enable manual target identification without having to wait for the CP/G to identify them.
If your high action display indicates no LOS for a target in poor lighting conditions then smoke may be the culprit.
Black smoke from burning wreckage and purple smoke grenades will hide objects from your EO sensors if it's thick enough.
Helmet Mounted Sight / IHADSS
This targeting mode is very much tied to your internal cockpit view position, it targets the closest object to the centre of your view automatically. Generally it's good for really dumb close range target strafing and picking off the small vehicles at enemy FARPS and airbases.
Also, once a target is killed it is removed from the target list immediately. Should you have an awkward radar target that it says has no LOS, switching to the helmet mode and looking at it should clear it.
All optical systems are effected by lighting and weather conditions. At dawn or dusk, using the HMS/IHADSS will be ineffective unless the night vision mode is activated.
FLIR, DTV, DVO, LLLTV, PERISCOPE
Most of these systems are near identical. Differences being the default magnification and ability to handle poor weather conditions. But they do offer an MFD view of whatever you are targeting, even when using the radar you can cycle through the MFD pages and bring up the EO display.
The exception is the Hokum's full-screen Periscope display. This is a direct-optics device and is not fitted with any night vision equipment.
 |
 |
|
Figure 4-5: Heads down MFD view clearly shows your missiles as fast moving points. Very dramatic. |
Figure
4-6: During attacks on airfields, use the FLIR views to locate important structures |
4.4 Advanced Gunnery
Now we will use some of the techniques about radar line of sight and sweep rates and cover their use in various kinds of missile attack.
Comanche & Apache Specific Launch Modes
First it is important to cover some differences in Hellfire missile launch modes. The Havoc does not have this capability so the following notes about LOAL/LOBL launch modes do not apply.
LOBL (pronounced: lo-ball)
Lock On Before Launch. The default launch mode and should be the preferred launch mode. The Hellfire follows a direct trajectory and requires the target be in range, in the seekers field of view and be in line of sight. This is indicated by "VALID LOCK" in the head up display. The missiles maximum effective range is 8km.
LOAL (pronounced: lo-al)
Lock On After Launch. The missile does not require line-of-sight for release. This mode is used to fire a missile from a concealed position without exposing yourself to the target. The firing helicopter can remain hidden throughout the entire duration of the missiles flight. After launch, the missile performs a zoom-climb. This is to clear any obstacles such as hills or buildings in front of you.
Figure 4-7: Using LOAL to kill targets on the opposite side of a town
However, the climb during the missiles motor burn period reduces the energy to missile and reduces it's maximum effective range to around 5km. It gets worse. If the target is closer than 2.5 km, when the missile reaches the top of it's climb and noses down to hunt for it's target, the missile overshoot since it has too much forward velocity and too much altitude.
The relative height difference between the helicopter and the target will alter the Hellfire's effective maximum AND minimum range.
Because of this, LOAL launch mode should be reserved for situations where it is tactically prudent.
While radar Hellfires are fire and forget, in Enemy Engaged it is possible to switch targets while the missile is still in the zoom climb phase. Once the missile noses over to begin its dive, you can no longer change its target. This is something you should watch out for.
Rapid Fire Missile Attack Mode (Hellfire, Vikhr and Attacka)
Rapid fire missile attack mode refers to a method of simultaneously guiding several missiles in flight. Each missile in-flight will track the same target. However as each target is hit, a new target is designated and all remaining missiles currently in-flight will change course towards it. It does require that there is enough spacing between missiles so they can steer towards their new targets.
Designation of targets can be done manually, however it takes longer to steer and requires full concentration which can be difficult in a hover. Narrowing the radar scan volume and using the priority filtering will automate the process (assuming there is line-of-sight throughout the engagement). Should line-of-sight be lost, manual targeting will be required.
Why should you want to perform such an attack?
Several reasons:
Eliminates the time of flight for each missile
Greatly reduces enemy reaction time and response capability
Allows for earlier egress from your engagement position
Clustered vehicles are easy prey
fig 4-8: Animation showing a Rapid Fire missile attack
Both the Apache and Havoc air to ground missile systems are capable of performing this type of attack profile. However this attack can not be performed using the Apache's LOAL mode when there is no line-of-sight. Radar guided Hellfire's can not be redesignated mid-flight in the LOAL mode but they can using the LOBL launch mode. Once a radar Hellfire has been fired, it can not be redirected to new targets unless fired in LOBL mode.The campaign AI in Enemy Engaged Comanche verses Hokum is reactive, so once you begin an attack, a retaliatory strike will be assigned to available enemy resources. So there may not be time to wait 11 seconds or so between each missile. Each situation is different, it is up to you the pilot in command to determine the best and safest strategy.
Target Persistence - Destroyed Targets can still appear on Radar
Unlike other simulations, when a target is destroyed and there is no direct line of sight, it will still remain on the target list until there has been visual confirmation of it's destruction - by re-establishing line of sight - when it is removed. In this situation, a radar guided Hellfire can be fired at a target that is unknowingly dead already. Result: waste of a good (and expensive) missile that could have been used against a more deserving target.
While the radar guided missile Hellfire is the only choice against targets without direct line of sight to you, the laser Hellfire and the Attacka or Vikhr are best used in rapid attacks on large target clusters.
Method
- Set target priority filter accordingly
- Adjust radar ground radar to rapidly sweep targeted vehicle group
- Launch missile
- Wait a few seconds or wait for the radar's return sweep
- Repeat from step 3 as required for the number of targets
- As each missile hits, the radar should re-sweep the destroyed target and remove it. (The missiles "Time Of Flight" indicator in the head up display will show the time until the next missile impact.)
- The next target should automatically be designated, (if not and "NO LOS" is displayed then select the next target manually).
- Wait until all missiles have impacted
It becomes quite easy with practice.
Best targets for this attack mode are:
- Road Convoys
- Parked vehicles at road junctions
- Airbase SAMS using the HIGH priority filter
Armour Protection
Armoured vehicles, particularly main battle tanks have varying degrees of armour protection. The frontal surface of a tank is built to withstand enormous mind numbing amounts of kinetic energy. Tanks may survive a direct hit from your ATGMs if hit in the front quarter. All vehicles have damage modifier in each quadrant.
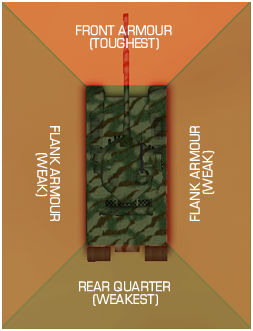
To conserve missiles you should reposition and attack such that the missile strikes the side or rear armour.
4.5 Ballistic Weapon Attack Modes
There are three main attack methods in helicopter gunnery...
Hover Fire
Running Fire
Diving Fire
These methods describe the motion of the helicopter during the attack. We will take a look at each one in turn.
Hover Fire
The technical definition of Hover fire is any engagement made below Transitional Lift (TL) speeds. Any attack made from a hovering position is considered as Hover Fire. In a hover, the aircraft is less stable and subject to effects which degrade hit probabilities, such as wind, and fired weapons causing aircraft movement. In Enemy Engaged Comanche verses Hokum, rockets and cannon shells in flight are not effected by wind or gravity effects.
Here are some general pointers for Hover Fire.
- Use hover hold or cyclic trim to maintain attitude or position.
- If the threat and terrain conditions allow, drift with the wind, don't make things harder by fighting to maintain a position if you don't have to.
- Adding collective will cause the aircraft to briefly yaw to the right, reducing it will cause the aircraft to turn left. This is something you can exploit for fine tuning your aim if rudder controls are too sensitive.
- Hover Fire Rocket attacks in the Havoc is much more difficult since the Havoc's rocket pods are not elevated. Running or Diving Fire attacks are the norm.
Running Fire with Rockets (or cannon)
Forward airspeed adds stability to the helicopter thus making rocket attacks more accurate. Also, the forward velocity of the aircraft is added to the rockets forward velocity, thus extending its range.
The procedure for a Running Fire attack is as follows:
- Select an initial point (IP) about 8 to 10 kilometres from the target. The IP should be an identifiable terrain feature or waypoint added on the in-flight map. The IP is selected primarily as a function of the desired route to the target.
- The helicopter departs the IP toward the target flying contour, using terrain to mask the approach.
- Approximately 6 km from the target, the pilot starts a climb to achieve LOS with the target. Once the crew acquires the target, the pilot levels the aircraft.
- At 5 km (Hydra rockets) or 1300 m (cannon) from the target, the pilot starts a shallow 3-to 5-degree dive angle and the crew begins engaging the target.
(Havoc crews can engage from 6 km if armed with S-13 rocket pods. S-8 rockets only have a range of 4 km. The Gsh 23mm cannon has a range of 2 km.)- At 3 km (rockets) or 1 km (cannon) from the target, the pilot begins his break and uses terrain to cover his departure from the target area.
- The crew returns to re-attack on the target or returns to the IP and holds.
The aircraft should NEVER overfly the target even if it appears all targets have been destroyed. At ranges of less than 3km the aircraft becomes vulnerable to return cannon fire.
If playing with a wingman, you might consider multiple attacks by co-ordinating staggered running fire attacks with rockets. For maximum effect, crews should commence their running fire attacks from different locations and directions. This will confuse the enemy and reduce the chance of possibly hidden targets remaining undetected.All ships can continue to circle back to their IPs making repeat runs at the target until the engagement is broken off. Care should be taken to ensure that there is enough lateral spacing between ships down the axis of the attack to reduce possibility of friendly fire incidents.
Diving Fire with Rockets
Again, as with Running fire, the airspeed of the aircraft improves accuracy of a rocket attack. Also you get a better visual and scan coverage of the targets, the high angle will reveal contacts that otherwise would remain partially masked.
The disadvantage of such an attack is the high airspeed - less time to line up the attack and retreating blade stall effects interfering with flight controls.
Use a careful cross-check because target fixation may cause the pilot to fly the aircraft into the ground. The pilot should complete the recovery from the dive no lower than 500 feet AGL.
The pilot must plan the dive recovery in time to avoid abrupt recovery manoeuvres. If an abrupt recovery is attempted at high airspeed, "mushing" may occur. When the pilot tries to recover from a dive, the high rate of descent and high power setting cause the controls of the helicopter to become less responsive. Mushing may prevent the pilot from recovering from the dive.
The procedure for a Diving Fire attack is as follows:
Establish entry altitude 1,500 feet AGL (above ground level) minimum, ±100 feet.
Establish entry airspeed 100 KIAS (normal) or 50 KIAS (steep), ±10 KIAS. (KIAS = knots, indicated air speed)
Establish a 12- to 15-degree dive angle (normal) or a 30-degree dive angle (steep), +0 to -5 degrees.
Maintain the aircraft in trim.
The crew begins engaging the target.
Recover to level flight before reaching computed Vne (velocity never exceed) or 500 feet AGL.
Correctly perform crew co-ordination actions.
If there is some difficulty in recovering then kick hard right pedal (left pedal in the Havoc) and reduce collective to 30%. This should reduce power to the rotors, increase drag and increase the amount of cyclic authority. An unorthodox procedure true but it seems to work. Try to avoid rolling out until the nose is level.
4.6 Spoofing IR and Radar Guided Missiles
In an area where enemy contact is expected keep one eye on my ASE as advanced warning. Any with a connecting line means they've locked on to you and will most probably engage.
When you get a launch warning the ASE or the Havoc’s TWD will indicate the type of inbound missile and the number of seconds before impact.
While Apache Havoc has an option for automatic countermeasure launching, do not rely on this to save your hide. By all means leave auto countermeasures turned on, as this takes away the task of manually turning on the jammers. But you should get into the habit of dumping CM stores by hand. Your survival rate will greatly increase.
Manual Countermeasure Launching
Both flares and chaff have an effective duration of three seconds from launch. This means that a flare launched to spoof a missile that’s eight seconds away will burn out when the missile is five seconds away. You should also be aware that a spoofed missile can re-acquire you if the countermeasure it is chasing expires.
I recommend the following:
- Dump a flare or chaff bundle every two to three seconds.
- When a missile is less than three seconds away and still inbound, launch doubles.
- If the missile is one second away, keep hitting the dump key.
- Jink away from the missile, should the missile detonate on your countermeasures while you are nearby, you will suffer damage from the proximity of the blast.
Do NOT feel you have to conserve chaff or flares, you can't use them once you're dead. It really is a matter of use them or loose them.
You will know when the missile has been spoofed as the "countdown" will vanish. In the Havoc the "countdown" is the light sequence as pictured in the manual. Get familiar with the symbology if you are not already.
Accuracy
Travelling perpendicular to a tracking gun or missile will increase the angle of error. This means a greater chance of it missing you since it requires more lead ahead on the part of the tracking gun or missile seeker. All guided missiles in this simulation compute intercept trajectories, the further away from the computed intercept point you are with each fraction of a second - the safer you are.
Ground clutter
Another trick you can use is hiding yourself in the ground clutter. At altitudes of less than 40 feet AGL, radars (such as mobile SAMs) have difficulty tracking you. This is the biggest weakness of remote SAM emplacements, if you are low enough you can approach until they are within cannon range.
Exploit Lead Pursuit
All guided missiles in the simulation follow a "lead pursuit" trajectory. A dangerous low-level tactic can be employed to exploit this. At low level, a rapid loss of altitude will make the missile nose into the ground as it plots an intercept point that is "below ground". This requires good timing and consideration for the "powered descent" effect. Positioning a hill between you and the incomming missile will cause it to dirt dive.
WARNING
Laser devices are potentially dangerous. Their rays can and will burn someone's eyes if they look directly at them. Users should not direct the beams at friendly positions or where they could reflect off shiny surfaces into friendly positions. Other soldiers must know where lasers are being used and take care not to look directly at the laser beam.
| Enemy Engaged - Comanche vs Hokum Strategy Guide | |||